
This year, my friend and campmate Aaron and I decided to take our skills and build something for ourselves, on top of our usual Duck Pond duties. We had been talking about an art car for a while and my friends old one just kinda fell into our lap. Above you can see a picture of what we are working with.
We bought this cart as well as a trailer with benches on it that was setup to hold about 6 to 8 people. It was owned and operated by my friend Andy under the name ‘Liberace’. It’s seen many trips to the playa with them and before that it was owned by someone in the Space Cowboys. Pictures of its past life can be seen here on Flickr.
The cart is of an unknown manufacturer, displacement, and any real history. All names and logos are long gone and stripped off. What I do I know is its a simple bidirectional 2-stroke motor with a small single barrel carburetor and a centrifugal drive mechanism. The part I found strange was that there is no idle. When you lift your foot from the gas the motor turns off. Just as well, its more environmentally friendly and wastes less gas. Nevertheless, I’m pretty happy with it as it is a simple drive mechanism and much easier than the car I usually work on.
The inspiration
As you can see from the picture above its a pretty uninspired looking cart. Rather than slap some color and fur on it and call it a day, we wanted to create something different with a lot of attention to detail. Something that would grab the attention of passerby’s on the Playa. The Flintstones idea, like many good ideas, came to us out the blue when we were thinking of other ideas.

The picture above is our inspiration photo. I found it on one of my favorite maker sites, instructables.com. A family had made it for their kid and its a perfect jumping off point for us to follow. I also got the ideas for the fake wooden side rails made of foam from them. The article can be found here.
The idea
As I mentioned before, our idea is to be very authentic and detailed. We are using real bones for handles, twine to hide modern bolts or materials, and all of our electronics will be hidden. We are also using real wood and branches wherever possible to complete the look. Below is a sketch of the vehicle.

(click image to see a larger version)
Our car is going to be mostly operating without the trailer behind it. Although we will take it out from time to time, its mostly a personal transport/ice hauling vehicle. On the back, we will have a bench seat and removable foot rest for when we are not using the trailer; however, when the trailer is in use we will remove it and not allow people to sit back there as it is dangerous. For more pictures of the trailer please see my Flickr page.
The most complicated part of our project is going to be the wooden canopy. Not only is it going to be tough to turn 4×4 square pieces of wood into round looking branches, we will need a lot of support structure. We are going to be bolting the canopy into the frame rails as well as using metal pipe to support the heavier components of the canopy.
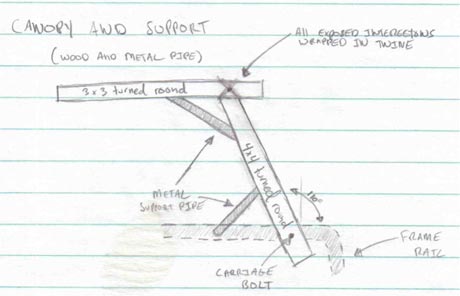
(click image to see a larger version)
Once the final structure is said and done, we will wrap all the joints and cover all metal pieces with twine to keep the look authentic. And of course we will have a burlap white canopy to shield us from the sun.
Our next challenge will be to add modern electronics without having them show and ruin the look we are going for. We are going to be adding a small 50-or-so-watt stereo and speakers in the dash as well as some other lights and switches. Below is a sketch of the fake slate dashboard we will be building.

(click image to see a larger version)
The trailer
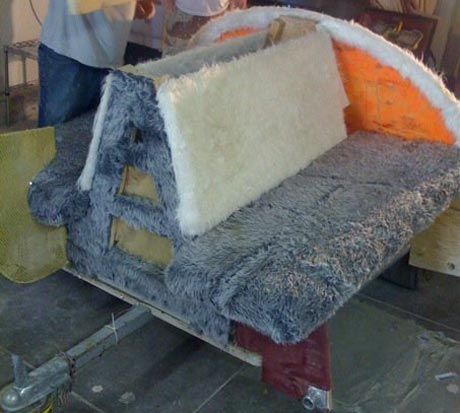
Below is a photo of the trailer. It can hold three people on each of the side benches and two on the back bench. Time permitting we are going to tackle the redesign of it but as of now we have our hands full. Luckily for us its fully operational and ready to go, it just needs more lighting.
The lighting
We do plan on driving at night so we will clearly illuminate our car and trailer. We plan on having a few different types of lighting. The first and most blatant for safety will be amber lights underneath the car on all sides. Not only will it help others see us, it will us to get on and off. The second type of lighting will be under-canopy lighting that will be red to allow us to see while others will be able to see us. I feel that should be enough; however, we are planning on creating some lanterns with dim little flicker bulbs hanging off the canopy and maybe on the front to really help complete the look.
Our trailer will also be equipped with lighting in the case we want to take our friends out at night. It barely had lighting when we got it from our friend other than the rear red running lights. We will add amber underneath/side lights to clearly illuminate the ground below which will help us be seen. Also this will aid in our passengers ability to safely get on and off.
The conclusion
As I’ve said before, when all is said and done we want this car to be true to the theme and interesting to look at out at Burning Man. We are even creating Flintstone character costumes to complete the look. We are not just creating a transport vehicle, we are creating something interesting and artistic, melding form and function and contributing back to the community.
(Follow up post, Flintstones art car is coming together)

Finally, after redoing my engine, fuel and air delivery, and spark management I have gotten around to putting on a set of step headers to help the motor breathe a little harder. Since I have 4 individual throttle bodies its only fitting that I let that air get out of the motor faster as well. Also, it will help the engine run a little cooler.
Putting the headers on wasn’t all that hard although it was tricky at first getting them to fit around the tie rods. The trick was to turn the wheels all the way to left and they slid right past. Other than that, fitting the exhaust was real chore! I have always had problems with it rubbing on my rear subframe so this time I was determined to get it right. It probably took 2 or 3 different times taking it on and off after driving it around only to find that something was still rubbing. In the end, what worked best was fitting the exhaust from the collector back, fitting it just right, taking it off and pounding it place so there was no chance of movement. After a few hours of work and help from my house mate it was perfect.
Since I have installed it I have noticed a few things. First off my low end torque has improved. Not by a lot but definitely noticeable. Also, the high end power feels quite improved as well. Once I pass 4k it really screams. Finally, I have noticed my coolant temperature being much lower throughout different duty cycles. Overall, a great buy and a noticeable difference. Thanks again to Ireland Engineering for their great parts.

Its always been my dream to have an automated house and the first step is hardwired Ethernet. Whether you are going to be running video over Ethernet, VoIP, or just the good old Internet you really just cant beat copper. Although wireless has come a long way since 802.11b it will just never keep up. Besides the fact that copper performs flawlessly and extremely fast, there are no reliability issues that you inevitably run into while using on WiFi. If anyone out there reading has found a perfect WiFi Access Point that can run at gigabit speeds for hours at a time with 5 – 10 devices on it please let me know. It would have saved me a lot of trouble!
For the full writeup with tons of pictures please see my post Wiring For High Speed Ethernet on San Fran Vic.

In true geek blogging obsession/narcissism, I have decided to blog the restoration of my 1890 San Francisco Victorian home at www.sanfranvic.com. Its going to be a long journey and I’ve decided to document it for my friends, family, and any future owner of the house.
It should be interesting to learn what goes into an old house like this one, where it came from, and where its going. Although I have a lot of experience engineering and building many many things, this is my first home restoration. So follow along with me, learn from my mistakes, and try not to yourself like I am going to. Enjoy!
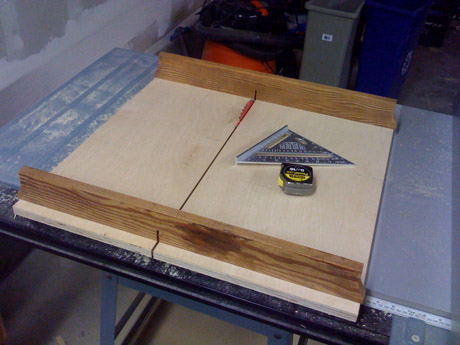
One of the most simple and useful things I have made in my shop so far is this crosscutting jig. It is perfect for when your chop saw just doesn’t reach far enough to cut a big piece of wood. Also, I have much nicer blades for my table saw then I do for my chop saw. Either way, it is a quintessential jig to have in your shop.
I made this one with some scrap wood I had lying around the shop in a matter of an hour or so. The base is made from birch veneered plywood and the rails are made from oak. I bought the T-tracks to guide the sled from Rockler, my new favorite store. Other than that, there’s not much to it. I decided to use dowels to hold it all together but screws or any other type of joinery would work just as well.
The most important part is getting it square obviously. What I did was made the base perfectly square, measured the distance between the tracks on my saw, then attached the tracks to the sled. Then I clamped the jig the saw, turned on the blade and raised it up through the wood. Now with my T-square I am able to line up the pieces that hold the wood perpendicular to the blade. Thats all there is to it. This design is very simple and straightforward but if you browse around the web you will find all sort of different designs, additions, and safety additions.
(More pictures can be found in this Flickr set)

For years I have been trying to create a Media Center to attach my TV. I’ve tried Windows Media Center years ago, Myth TV on Linux, and everything in between. Nothing was simple, cheap, and easy to setup. I have friends who have tried those off the shelf media boxes like the ones from Netgear and the likes, but those have their pitfalls too. I wanted something open source, truly hackable, and preferably something Unix/Linux based. Thats why I turned to the Apple TV.
For my use case, I did not care about disk storage. I am using my Apple TV’s as terminals or endpoints to play media from storage somewhere else on the network. This allowed me to buy the cheap version of the Apple TV with a 40 GB drive for about $220. Not only that, there is a Toslink (optical) out that I will be attaching to a DAC and set of vintage tubes for crisp beautiful sound. For that kinda money, its pretty hard to beat the Apple TV.
Once in my possession, I immediately hacked it to expand its functionality. Without it, the Apple TV is actually pretty restricted and an overall weak product; however, Boxee helps make it all better. Boxee allows you to watch all those formats that iTunes does not support, like DivX, etc. Not only that, it allows you watch Hulu as well as other online video services.
Hacking your Apple TV and Installing Boxee
There’s actually nothing to do really and I would barely consider it hacking. A few folks out there have made it quite easy. In a nutshell, all you need to do is create a ‘patchstick’ on your PC using a thumb drive you have laying around. You insert it into your Apple TV’s USB drive, restart it, and voila! It installs itself and you’re all set. You can get the USB Patch Stick creator from the Google code repository.
If you’re house is even half as old as mine is, its likely that you have similar sash and weight style windows. You know, the ones that are cold, drafty and often times have snapped ropes? Luckily, they are pretty simple to work on for the average do-it-yourselfer. Eventually I am going to replace the weights with spring balances and insulate but for now they just needed to be done. Another person helps but this definitely could be done on your own. These windows usually arent too heavy. There is plenty of information and how-to’s out there on YouTube and and This Old House’s web site.
In my case, I needed to duplicate some weight pocket doors because I was missing a set. This unfortunately is a little more advanced but anyone with some table saw skills can make these. All you need is a miter and some scrap wood. More pictures and descriptions can be found on my flikr page.
When my housemate and I moved into our new place we weren’t thrilled with the victorian-style knockoff chandelier that was in our living room. Our friend recommended we paint it and see if we still wanted to throw it out. So, I took the idea and ran with it. Needless to say, it’s definitely not getting thrown out any time soon. Here is a picture of the finished product.
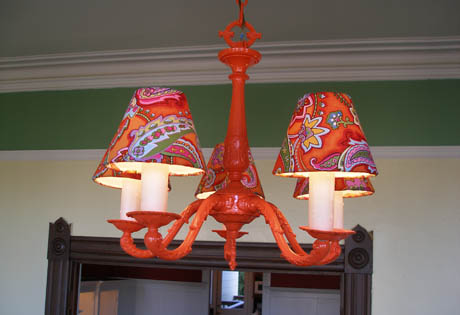
This was a pretty simple project and started out with a beat up old chandelier. I took it down and cleaned it off as best I could with soap and water. Then I sprayed it with some white primer before hitting it with two coats of high gloss orange. That was the easy part and didnt take too long.
Next I had to track down some small lamp shade covers. I came across a nice set of 8 at lampsplus.com. First thing I did when I got them was template. This was crucial in cutting out 5 copies from the fabric. I simply wrapped a big enough piece of paper around the lamp shade and taped it. Then I trimmed up all the excess and unwrapped it. Voila template.
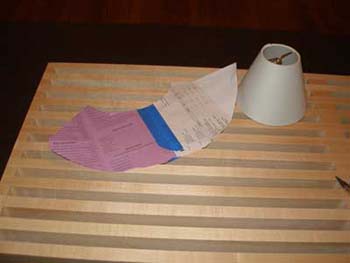 (click the image to see it larger)
After all of the fabric was cut out it was time to warm up the glue gun. Make sure to try and line up the fabric seam with the seam thats already on the lamp shade. First I glued one side down where I wanted it, then I would take out all the slack and wrinkles and fold the over the other side. Dont worry about making this perfect. Once you fold over the top and button around the lamp shade rim you can deal with the rest of the slack.
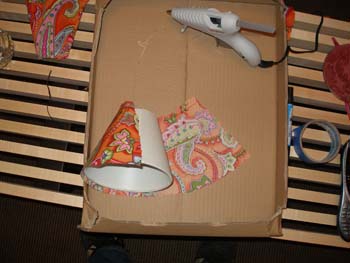 (click the image to see it larger)
And thats it! There’s not much to it and it didnt take long. I was able to save an old chandelier from the dump and go something completely original in return. There are more pictures up on Flickr including one of the completed room.
A coworker and I came across this block of code which was causing us numerous headaches over the past few weeks. For a while, there was absolutely no time delay which was causing an inordinate amount of CPU cycles but thats besides the point. After that was fixed with a short delay we were left with what you see below. Can you tell what’s wrong?
1
2
3
4
5
6
7
8
9
10
11
12
13
14
15
16
17
18
19
| while ( true ) {
TriggeredSend ts = queue.peek();
if ( ts != null ) {
switch( doPost( ts ) ) {
case SUCCESS:
queue.take();
ts.complete( true );
break;
case FAILURE:
queue.take();
ts.complete( false );
break;
case SYSTEM_UNAVAILABLE:
systemIsAvailable = false;
break;
}
}
Thread.sleep( delay );
} |
As with most concurrency bugs, its hard to determine what’s actually happening without experience. You can turn on your debugger but then you are changing the way the code behaves by slowing it down, essentially taking out any race conditions. Turns out, the same task was getting invoked multiple times well as some other strange conditions. That led us to the block of code you see above.
Figure it out yet? Well, what’s happening is that when the code is peeking into the queue, its assigning the result to a variable which is then being called. According to the java.util.concurrency spec, the peek method is used to see if the queue has tasks in it and not used to take any tasks off the queue. Not only that, but after the task was invoked, another task was being pulled off the queue. So what happens when multiple threads come through that block of code and peek? Well, they can both get the same task and invoke it. Bad bad bad.
Originally published on semanticweb.com
A few months back I posed a question to the folks at DERI (Digital Enterprise Research Institute) from the University of Ireland when they came to visit Radar Networks. This is a question that I have struggled with for a long time; seeking for answers anywhere I could. When I asked them, I heard the same question in response that I always hear.
Why? Why would you ever want to delete something out of the ontology?
Ontologies were not originally created to have things removed from them. They were created to classify and organize information in a relational format. Just because a species goes extinct it doesn’t mean it should removed from the domain of animals does it? Just like a car that isn’t manufactured anymore or a disease that was officially wiped out. These and many more are probably the reasons why Semantic Web gurus and ontologists alike don’t like the idea of deleting entities.
I am helping to create a social site where users generate content; objects, notes, data, and connections to others and other things that are their own. If they want to delete something that they have created, so be it. Sounds easy right? Well, yes and no. This problem is dealt with throughout computer systems. It is essentially all about managing pointers in memory. You can’t delete something that other things are pointing to. Who knows what will happen or how our application will respond when certain pieces of information are missing? Some things we account for on purpose because they are optional — but some things we just can’t. Every application has its unique constructs, whether it is built on a relational database or a triple store.
So what I have to do is define ontological restrictions, stating what links can and cannot be broken. On top of that, we must worry about permissions. Am I allowed to break an object link from someone else’s object to my own? Also, what if the object being deleted has dependent objects that cannot exist alone, or more importantly, don’t make sense on its own? A great example of this is a user object and a profile object. There should either be zero or two, never just one.
My friend and coworker Jesse Byler had dealt with a similar problem in the application tier a few months back regarding dependent objects. He had written a recursive algorithm that would spider the graph until it hit the lowest leaf node matching certain criteria and then begin to operate. I took this same principle and pushed it down into our platform and began to mark restrictions in our ontology.
This is where it became tricky. Some relationships are bi-directional and some are not. In the user and profile example above the relationship is bi-directional; however, many of our relationships are not. An example to this would be a group and an invitation to that group. Sure the group can exist without invitations, but the invitation cannot exist without the group.
All in all, the design pattern isn’t overly complex, nor are the ontological restrictions. But as a whole, it makes for an interesting problem with a lot of nuance. Careful consideration must go into this process because mistakes could be catastrophic. Data integrity is paramount and dangling references could leave the application in a terrible state due to one bad linkage. Although simple in practice, the execution is anything but.
And for those of you who are still asking yourselves why?
Here’s the answer. Scalability. As if working with a triple store wasn’t hard enough, keeping useless data around that will never be used again will definitely make matters worse. We are attempting to build a practical everyday application — not classify organisms. Surely there is a place somewhere in the mind of the ontologist where he can think practically about using ontologies for data storage. Isn’t there?
As more applications are built using OWL and RDF, this problem will become more and more real — and there’s nothing the ontologist can do about it but adapt, or die a little inside. Either way, at the end of the day, I am still an engineer trying to make do with what I have.
If we must delete, then so be it.


