
It is with great sadness that I will be missing the burn this year after participating six years in a row. I met the people who I would later cofound the Duck Pond with back in 2005 and I’ve gone every year since. Now its six years later and the camp is still going strong. It’s evolved in every way; scrutinized and perfected down to the smallest detail. Just as it’s grown and changed over the years, so have we. The experience has taught us so much about ourselves, managing others, logistics, and most of all– perseverance. Keeping a cohesive group of about 50 people together throughout the years has proven to be an incredible joy but also a great challenge and responsibility.
Since I am not attending this year I have decided to take this opportunity to share my experiences building a long standing theme camp. This is something that my campmates and I have talked about for years but just never had the time. The endless amount of tribal knowledge at Burning Man takes years to amass; trial and error are a way of life at Burning Man. If someone had taken the time to write down even half of their knowledge I would have been infinitely in their debt. For me, Burning Man is about community building and hopefully this small contribution will help that community that I’ll be missing this year.
Please keep in mind when reading this that there are many ways to build a theme camp. This is what worked for us based on our size and other parameters we want to live by. All camps are different and fun in their own way. They are a reflection of the people who build them. This is a reflection of how we like to do things.
Becoming a theme camp
Although anyone can come to Burning Man and find some unoccupied land to pitch a tent, to become a proper registered theme camp with land deemed yours for the week, you must offer something to the community. Whether it be a Slip-n-slide and bar like our camp or a Barbie petting zoo or mini-golf course, you must invoke participation. Once you have your idea and mission you must fill out the official theme camp questionnaire to be considered by the Burning Man Organization. Unfortunately not everyone who applies will be granted theme camp status because there are just too many applicants. I highly advise you to take your theme camp questionnaire seriously, especially if you are a first year camp. More information about theme camps can be found on the Burning Man theme camp page.
About the Duck Pond
To give you an idea about the level of intelligence and insanity of my group (yes, you need both to be a good burner), here is the stop motion video created last year chronicling our camp build. Total time elapsed is 16 hours assembled with 25 people.
Trust me when I say, it wasnt always this easy. Our first year out in 2006 we bit off more than we could chew and ended up building in the searing heat from Saturday to Wednesday. Even the next year when we thought we had it all figured out we were still finishing the build on Tuesday. Before I go too deep into what worked and what didnt, I should explain our camp’s mission and scale.
We are a dive bar at heart, with a daytime dance scene and a 150′ slip-n-slide with jazz and ambient music at night. The bar is open 23 hours a day and our bartenders are always happy to help. We can always be found on the 9 o’clock side of the playa, usually at E street. Also, the 40 foot tower topped with a rotating yellow duck makes us pretty easy to find. As for our people, they are always hard working and never more than 50 of them. Since the beginning we’ve always wanted to be an intimate first-name basis camp with family dinners and we’ve been able to stay true to our foundings. I believe this is one of the reasons we’re still together today.
On the flip side, although our size and intimacy are one of our greatest qualities it’s also a hinderance in respect to scaling. With 50 people paying dues each plus fundraisers, we’re left with a $20,000 budget to build our camp. This may sound like a lot of money for a theme camp but putting on a week long party for free in the desert isn’t cheap. Some camps have budgets upwards of $100,000 but for us being resourceful is a big part of making it all happen.
People and Responsibilities
Yes even at Burning Man there are responsibilities. The people are the most important asset to any group, company, or organization and a Burning Man camp is no different. The amount of sweat and tears that go into the months of planning each year can be overwhelming. We’re lucky enough to have over two dozen incredibly dedicated people to spread the load.

From the beginning we’ve instilled a work-hard/party-hard attitude. It’s essential to the core of this group. After the 2005 burn where the other founders and I met, we returned home to San Francisco and merged our friends together. From there those friends invited other friends of similar attitude and worth and the cycle continued. We let anyone in our group as long as they understand what it means to be a Duck.
As for responsibilities, everyone has a job and they’re expected to do it to the best of their abilities. Each project has a team lead and people who help them. Whether you’re a truck packer, kitchen cleaner, or structure builder you always have help.
Once the camp is up and running there are also chores and responsibilities. The camp needs cleaning and maintenance from time to time, especially the bar. We used to have chore lists and shifts for such things as bar tending and cleaning but as the years have gone on they have faded away. People mostly manage themselves and our community hums. There are even times when we have too many bartenders which is not a bad problem to have.
Organization
A critical part of our camp is serious organization and structure. We have a head committee who dedicate their time to organizing and leading projects. In the end it is them who take direct responsibility for accomplishing all of their required tasks. This team is also vital in keeping the camp’s vision a reality and not deviate from our foundings. This vision, morale, and sense of camaraderie must come from the top down and in turn it comes back from the bottom up.
Another critical part of our organization is a camp leader to head our operations. Someone directly responsible for the day-to-day activities from camp budgets and collections to fundraising and conflict resolution. We’ve also found that the best two leaders we’ve had, including our current one, have been women; incredible motherly types who can take charge and make all of this possible. Without them we wouldn’t still be here today. Thank you Amanda and our current leader Robin Guido for all your hard work.
Communication
Over the years we’ve tried many different methods of communication. Most of it has been based around email but we have had great success with a wiki as well. It really helped us to collaborate and get our thoughts in order when we first started this endeavor. As the years went on and we gained more experience we’ve slowly migrated back to email and Google groups as they fit our simple needs. We also use Facebook to communicate with our fans and campmates for fundraisers and other events. For simple day-to-day operations and communication we use an email list. This is a great place for us to organize, share, and have fun with one another all year round.
As for camp budget and other planning documents, our camp leader uses spreadsheets and Word documents. In case you are wondering, these documents are made public to the camp. Not only are they emailed out from time to time, they are printed and distributed to the camp before we all head out to burn. We believe that it’s in everyone’s best interest to know where their camp dues are going. We feel that transparency is the only way to run a camp.
Infrastructure
The most important thing when it comes to infrastructure is reuse. No matter what it is you are building you don’t want to have to build it twice. Some of you are probably saying, “but we won’t go again next year, for reals this time!”. Every veteran burner I know has said this at least once. Even if it is your last year you recoup your money by selling your infrastructure to another camp. I can’t stress this enough. Don’t burn your infrastructure; build it once and build it right. Color code your bolts and poles, label everything, and do it religiously. You’ll thank yourself later.
To give you a better idea of what I’ll be covering in this section I’ve attached a satellite photo from this year’s Burn. We always use satellite photos from Gigapan to review the previous year’s layout and prepare for the next.

A. 5,400 square foot shade structure, 8′ tall.
B. 200 square foot kitchen
C. 1,200 square foot Bar structure
D. Truck (setup behind the bar to block the wind)
E. 150′ slip-n-slide
F. 40′ radio tower with rotating light up duck on top.
G. Two stall showers and evaporation pond
Shade
Shade is obviously one of the most important things on the playa. It is especially important that you get your tent under some sort of shade if your desire is to sleep past 8 am. I’m not talking about a rain tarp here, I mean a metal structure wrapped in tarps. Think wedding tents and car ports. Get something strong and durable that will last for years to come. Expect to pay nearly a thousand dollars for larger structures 50′x50′ or more.
We got our many shade structures from army supply type places around the bay area and on the web. For our sleeping shade alone we have 5,400 square feet of space for all of us to sleep under. It also supplies some nice relaxation areas in between areas with no tents. It is made up of 10′ poles for the roof, 8′ poles for the walls, assorted connectors, and the top is wrapped with tarps and stretched with bungees.
Be sure to keep your poles and tarps properly labeled. We spray paint every pole and connector so we can easily identify and inventory them. We also shake out our tarps, re-grommet any of the broken grommets, and fold them back up labeled with duct tape.
Kitchen and Meals
Since our first year we have had a meal plan which has been wildly successful. We divide up into teams of 6 or 7 and provide one meal a night and the other nights you eat free. We also believe that the family that eats together sticks together which is why we have a 50 person dining room table. This is a big part of who we are and how we stay cohesive. These dinners are one of the things I am going to miss the most about not attending this year.
This may seem obvious to many but in practice this doesn’t always happen. Once camps start growing past 75 or 100 people the kitchen usually suffers or becomes non-existant due to cleanup problems and other issues of scale. This is yet another reason why 50 campmates is the perfect number for us.
As for the kitchen itself we use a 10′x20′ carport. We fully stock it with everything you could possibly need from a BBQ and deep-fryer all the way down to the utensils, serving trays, and sink. This may sound daunting but if you’re resourceful you can find everything you need at garage sales and build the rest. For example, our sink consists of a 55 gallon drum with a makeshift top and strainer paired with a sun shower bag.
Showers
The showers are one of the projects that we haven’t gotten quite right until this past year. We never took the time to properly invest and we paid for it, year after year. Not only did we pay in cash, we paid in time which takes a toll on the team.
This year we stepped up and built proper showers that are nearly 100% reusable consisting of pressure treated color coded wood and stainless steel color coded bolts. It’s a very simple structure consisting of two 4×8′ sheets supported by 2×4″ floor joists that are held up by six 4×4″ posts.

In order to keep the wind out and to provide some privacy we wrapped the showers in vinyl which we source for free. Vinyl billboards are often tossed out or sent to Mexico as house wrap but if you know someone in the business or look hard enough on Craigslist you can find some. We even put grommets in them just like regular tarps.
For the shower sprayers themselves we’ve tried a number of different things from CO2 to hand powered. In the end, the easiest and most sustainable thing are good old gravity sun showers and hand pump sprayers. The simpler the better for something like this that gets used by so many people.
Gray Water
One of the unfortunate side effects of trying to stay mildly hygienic on the playa is having to handle your shower water. Like many of our infrastructure projects we’ve experimented with many different ideas over the years. This is a lengthy topic and there’s many ways to handle it so I’ll just talk about a few of our experiences.
The easiest way to evaporate your gray water is make a pond with 2×4′s for walls and a tarp. Then there’s the more advanced designs that use wind or electricity to speed the evaporation process. We’ve actually had a lot of luck with both. One year we had an incredible setup that would pump water up over vertical bed sheets to spread the water over a large surface area. Recently I’ve seen a couple of new designs which have also proven to be very successful and are much easier to build (video).
In the end we reverted back to a simple evaporation pool with a twist. We bring a simple 120v bilge pump to pump out any extra water into our empty 55 gallon drums that we bring home with us.
It’s quick and effective and costs us very little extra in time or energy. Sometimes it’s the little tricks that save you engineering headaches and let you focus other places.
Power
There are so many ways to solve this problem but for us it’s simply about cost and effectiveness. We use two Honda EU2000i generators that we run in parallel. They can easily be rented from a hardware rental store. They are extremely efficient and very quiet, capable of supplying 4,000 watts of power for a week on only 40 gallons of gas.
One of the best innovations in regards to power was a campmates auto-refueling system for the generator which we’ve perfected over the years. This allows the generators to run for an entire night without having the power cut out. If you’ve ever been to Burning Man, you’ve probably been at a camp or party where the generator goes out. A few dollars and a trip to the hardware store can solve this problem. Here is a video of a high end version of what we built. It utilizes the vacuum inside the generator to siphon gas from an external container.
Bar
If you’re anything like us then you love indulging in a few adult beverages. During the day our bar is packed with dancing party goers and at night it’s a great place to kick back and hang out at a neighborhood dive. Depending on what your goal is, you may not want a bar. That being said, if it’s lots of participation you’re after then you’re probably going to need one. You’ll see good camps with good music and no bar that are completely empty but right next door you’ll see a broken down shack with a great little bar teeming with people. This definitely isn’t true for the massive camps like Opulent Temple and the Roots with insane sound stages but for us mere mortals a bar is a necessary addition.
To house our actual bar and sound equipment we’ve always used military surplus tents but last year we upgraded to two large wedding tents. So far it’s been great and the beefy 3″ poles are a huge improvement over the usual 1″ army tent poles that they replaced. Also the fitted top is quite nice and happens to match our camp colors which is always a plus. We bought ours at tents4sale.com.
The bar itself is also reusable. It is 16′ long and built out of 2×4″ boxes and covered with a nice bar top that is bolted down. The front face of the boxes are covered in thin masonite. The key here just like everywhere else is to use bolts instead of screws. Always think reusable. Our first bar lasted us three years and now this bar is going on its third year. They have been built to last and sustain many daily dance sessions on top of it.
When it comes to stocking your bar you’re gonna need a big budget. Depending on your popularity you could run out very quickly. Last year we brought 20 kegs, 200 handles of Vodka, and almost a palette of mixers and we were running low on Thursday. Thankfully our neighbors and patrons donate to us constantly to keep our place open. We keep bringing more and more every year and we are never able to keep up. One last tip, bring more mixers than you can imagine. You’ll end up with random bottles of alcohol with no mixers probably more than once in your camp’s lifetime.
Signage
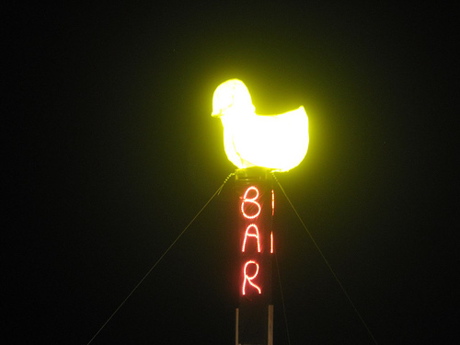
Signage is very important if you’re going to attract patrons, especially if you are off the beaten path. Not only that, once you attract them they need to be able to find their way back and tell their friends the name. For years we had branding problems and people couldn’t figure out our name. Even with a huge light up duck on top of a 40′ radio antenna people would call us the ‘Duck Bar’ or the ‘Slip-n-Slide Camp’. Finally we gave up and made a huge light up sign on the big yellow bar tent that says ‘Duck Pond’. This may seem brutally obvious but it took us years to get our signage just right.
Our tower has definitely been one of the more effective methods of attracting people. One year we even wrote the words ‘Bar’ down two sides. People showed up like moths to a flame. Not only that, it helps us and our neighbors find our way home from a mile away. Below is a photo from one of our earlier towers that was only about 30′ tall.
Sound and Music
We have a few talented DJ’s in our camp who cannot only spin, but they also know how to setup a great system and source the components. It’s usually a mix of personal equipment and some rented or borrowed. Unfortunately I can’t speak much to our sound setup as I’ve never worked on this team.
What I do know is that the desert can be very hard on the equipment. My campmates wrap the speakers in sheets and do their best to clean their components. Once they return home they need to be taken apart and cleaned. All of this can definitely add up to a large price tag so budget accordingly.
Trash and Recycling
Trash on the playa is a hard thing to contain and organize properly. Luckily we have an incredible trash tsar, thats right a tsar, who has done a great job keeping us in order. Not only do we bring out huge blue, green, and black bins from San Francisco so they’re recognizable, they are clearly labeled with color photos of what goes in each. All these details matter and we have seen vast improvement over the years with little optimizations like this.
The other major innovation that one of my cofounders pioneered is the air-powered incinerator (documented on our wiki). It burns well over a thousand degrees without any gasoline or other accelerant; so hot that it burns almost all of the pollutants out. Last year we were able to burn 35 bags of trash, leaving us with only 2 inches of ash. That’s almost 1 ton of trash. I’d highly recommend this if you have the skills and/or are crazy enough. In years past we would pack it all home to the dump where you have to pay by the pound.
In regards to the glass, plastic, and metal you have other options. The easiest is to bring them to the recycling camp if your scale is small enough. During certain times of the day you can cart over your empties and they will take some of them (I forget exactly what types they take). If you’re anything like us though, you have too much and it can be a hassle to get it over there. Instead we bring them back to the dump and get money back which pays for some of the nonburnable trash we have to throw away.
Camp Storage, Inventory, and Transport
Since we are a San Francisco based camp where space is at a premium we rent a storage space for the duration of the year. For the first few years we split up infrastructure between our collective houses but that has its challenges when your campmates are moving across the city all the time. More suburban based camps definitely have an easier time storing and sharing the load. For us, a thousand dollars a year makes the problem go away and gives our infrastructure a safe home. It’s also a great staging area to inventory our camp before the burn.
Each year before the burn we unpack our storage unit, inventory all the parts, and identify what needs to be fixed. We can’t bother to do it when we get back from the burn because we are so exhausted so we just store it for a year. Although this inventory process can be time consuming it’s paramount to ensure that we have everything we need.
For transporting our infrastructure to the playa we rent a 26′ box truck with a lift gate costing us over $3,000. We’ve seen other camps rent shipping containers, piecemeal it out between trucks, RV’s, and trailers, but for us city dwellers this is very effective. We could have bought our own truck 3 times over at this point but without a truck, we are a camp in a box without any other strings attached.
Setup, Teardown, and Packing
After the first year where we ended up spending 4 days building, we quickly learned we had to build at night. The searing heat led to slow build times and exhausted campmates. Since then we have always brought large halogen work lights to build at night. You can buy them at any hardware store for around $30 dollars and they are well worth it. Building your camp at night comfortably with your buddies and the music blaring is an incredible experience.
Another crucial part of a quick build is proper planning, packing, and ultimately building. This year we used satellite photos and a 200′ tape measure to layout our entire camp before the truck even arrived. With the ground staked with flags for the different structures we would begin to unpack the truck. As you may have seen from the build video at the top of this post, we employ fire lines to quickly unpack the truck. With a line of 15 people we could easily pass poles and other infrastructure anywhere we needed across our land. If you aren’t yet employing fire lines for your camp build I would highly recommend it.
To make the build go even faster we pack the truck in a very specific order. We know exactly what needs to come out and at what time which has greatly increased our efficiency. The same goes for teardown. We have a team of experienced campmates who run the truck load who have their own plan and schedule.
Conclusion
If you’re thinking about creating a theme camp I highly urge you to try it. Get a tight group of hard working friends together, plan, organize, and implement. Creating this camp has been one of the greatest pleasures of my life. The experiences we’ve shared with each other and the community on the playa are priceless. That community even spreads into our daily lives in San Francisco. I meet people all the time who have nothing but great things to say about our camp, our people, and our bar. I think that’s a big part of the reason that the machine keeps turning. It’s all fuel for the fire and hopefully this article will have the same effect.
There’s a part of me that’s glad that I’m going to miss the burn this year because I finally got the chance to write about my experiences, be nostalgic, and get excited for next year. Hopefully at the next burn I’ll get the opportunity to meet someone who has created something better because of the experiences that I’ve shared.


