Its always been my dream to have an automated house and the first step is hardwired Ethernet. Whether you are going to be running video over Ethernet, VoIP, or just the good old Internet you really just cant beat copper. Although wireless has come a long way since 802.11b it will just never keep up. Besides the fact that copper performs flawlessly and extremely fast, there are no reliability issues that you inevitably run into while using on WiFi. If anyone out there reading has found a perfect WiFi Access Point that can run at gigabit speeds for hours at a time with 5 – 10 devices on it please let me know. It would have saved me a lot of trouble!
For the full writeup with tons of pictures please see my post Wiring For High Speed Ethernet on San Fran Vic.

In true geek blogging obsession/narcissism, I have decided to blog the restoration of my 1890 San Francisco Victorian home at www.sanfranvic.com. Its going to be a long journey and I’ve decided to document it for my friends, family, and any future owner of the house.
It should be interesting to learn what goes into an old house like this one, where it came from, and where its going. Although I have a lot of experience engineering and building many many things, this is my first home restoration. So follow along with me, learn from my mistakes, and try not to yourself like I am going to. Enjoy!

One of the most simple and useful things I have made in my shop so far is this crosscutting jig. It is perfect for when your chop saw just doesn’t reach far enough to cut a big piece of wood. Also, I have much nicer blades for my table saw then I do for my chop saw. Either way, it is a quintessential jig to have in your shop.
I made this one with some scrap wood I had lying around the shop in a matter of an hour or so. The base is made from birch veneered plywood and the rails are made from oak. I bought the T-tracks to guide the sled from Rockler, my new favorite store. Other than that, there’s not much to it. I decided to use dowels to hold it all together but screws or any other type of joinery would work just as well.
The most important part is getting it square obviously. What I did was made the base perfectly square, measured the distance between the tracks on my saw, then attached the tracks to the sled. Then I clamped the jig the saw, turned on the blade and raised it up through the wood. Now with my T-square I am able to line up the pieces that hold the wood perpendicular to the blade. Thats all there is to it. This design is very simple and straightforward but if you browse around the web you will find all sort of different designs, additions, and safety additions.
(More pictures can be found in this Flickr set)

For years I have been trying to create a Media Center to attach my TV. I’ve tried Windows Media Center years ago, Myth TV on Linux, and everything in between. Nothing was simple, cheap, and easy to setup. I have friends who have tried those off the shelf media boxes like the ones from Netgear and the likes, but those have their pitfalls too. I wanted something open source, truly hackable, and preferably something Unix/Linux based. Thats why I turned to the Apple TV.
For my use case, I did not care about disk storage. I am using my Apple TV’s as terminals or endpoints to play media from storage somewhere else on the network. This allowed me to buy the cheap version of the Apple TV with a 40 GB drive for about $220. Not only that, there is a Toslink (optical) out that I will be attaching to a DAC and set of vintage tubes for crisp beautiful sound. For that kinda money, its pretty hard to beat the Apple TV.
Once in my possession, I immediately hacked it to expand its functionality. Without it, the Apple TV is actually pretty restricted and an overall weak product; however, Boxee helps make it all better. Boxee allows you to watch all those formats that iTunes does not support, like DivX, etc. Not only that, it allows you watch Hulu as well as other online video services.
Hacking your Apple TV and Installing Boxee
There’s actually nothing to do really and I would barely consider it hacking. A few folks out there have made it quite easy. In a nutshell, all you need to do is create a ‘patchstick’ on your PC using a thumb drive you have laying around. You insert it into your Apple TV’s USB drive, restart it, and voila! It installs itself and you’re all set. You can get the USB Patch Stick creator from the Google code repository.

If you’re house is even half as old as mine is, its likely that you have similar sash and weight style windows. You know, the ones that are cold, drafty and often times have snapped ropes? Luckily, they are pretty simple to work on for the average do-it-yourselfer. Eventually I am going to replace the weights with spring balances and insulate but for now they just needed to be done. Another person helps but this definitely could be done on your own. These windows usually arent too heavy. There is plenty of information and how-to’s out there on YouTube and and This Old House’s web site.
In my case, I needed to duplicate some weight pocket doors because I was missing a set. This unfortunately is a little more advanced but anyone with some table saw skills can make these. All you need is a miter and some scrap wood. More pictures and descriptions can be found on my flikr page.
When my housemate and I moved into our new place we weren’t thrilled with the victorian-style knockoff chandelier that was in our living room. Our friend recommended we paint it and see if we still wanted to throw it out. So, I took the idea and ran with it. Needless to say, it’s definitely not getting thrown out any time soon. Here is a picture of the finished product.

This was a pretty simple project and started out with a beat up old chandelier. I took it down and cleaned it off as best I could with soap and water. Then I sprayed it with some white primer before hitting it with two coats of high gloss orange. That was the easy part and didnt take too long.
Next I had to track down some small lamp shade covers. I came across a nice set of 8 at lampsplus.com. First thing I did when I got them was template. This was crucial in cutting out 5 copies from the fabric. I simply wrapped a big enough piece of paper around the lamp shade and taped it. Then I trimmed up all the excess and unwrapped it. Voila template.
 (click the image to see it larger)
After all of the fabric was cut out it was time to warm up the glue gun. Make sure to try and line up the fabric seam with the seam thats already on the lamp shade. First I glued one side down where I wanted it, then I would take out all the slack and wrinkles and fold the over the other side. Dont worry about making this perfect. Once you fold over the top and button around the lamp shade rim you can deal with the rest of the slack.
 (click the image to see it larger)
And thats it! There’s not much to it and it didnt take long. I was able to save an old chandelier from the dump and go something completely original in return. There are more pictures up on Flickr including one of the completed room.

Being a long time geek and open source advocate I’ve finally decided to start an open source project for home automation. I’ve always dreamt of being able to wake up to my curtains opening and my heat turning on rather than the usual “beep! beep! beep!” that beckons me to work each day. How about checking on the house when I’m away or open the front door while I’m in the back of the house. The possibilities are endless and my ideas are just beginning to flow.
The project is called Open Automator and it can be found on Source Forge’s site. Its still a very basic framework but its coming along well. It works using the Insteon protocol that communicates over the power lines in your house. Its very similar to the X10 of yesteryear but with updated speed, reliability, and redundancy. It costs a little bit more but it will be well worth it. These devices can be found all over the internet from sites like smarthome.com.
This first rendition will be geared toward the iPhone and Simple Home Net’s EZServe which communicates via an XML socket connection. That being said, I will be making this application very flexible allowing for many different types of implementations, not just Insteon either. The application is Java based with Maven being used for building and dependency management. This will be coupled with Spring and Hibernate to manage database and model view support. The final product will have Jetty and some sort of SQL engine rolled in to make the application extremely portable and platform agnostic.
I will be writing a lot more about this project in the months to come as well as recording some online videos about how it works and how to set it up. I would like to make this product as simple as possible so its usable by the masses. Just because its open source doesnt mean its going to be complicated. If you are interesting in being a developer please let me know.
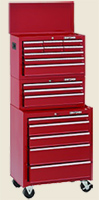 I’ve waited too long to take the plunge and start the tool collection I have always wanted. For years I have had an assortment of tools scattered between my various toolboxes, my car, and the friends who like to ‘borrow’ them. Now they finally have a place to call home.
Although I have never owned a chest like this before I feel good knowing they are Craftsman and guaranteed for life. Having used them in other shops and hearing only good things from all my friends I know they are going to last. The price wasnt too bad either. I also opted to stuff the drawers even more with a new set of 150 piece metric and assorted SAE sockets and wrenches. Now if only I had a real shop to put these in. For now, my front stoop and back yard will have to do.
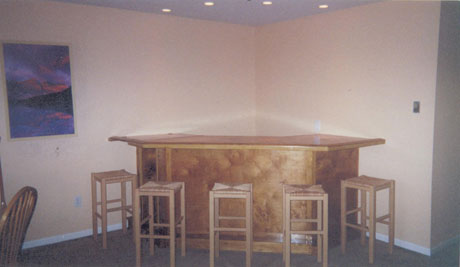
Not that kind of college bar. I built this bar in my apartment with the help of some friends my sophomore year in college. It came out pretty well considering I was 19 years old and didnt even have a proper table saw. Literally, we had a table and a saw. Anyway, behind the bar we put in shelving in the middle and enough room for a decent size fridge. On the floor we cracked old tiles and laid out a random mosaic pattern. The bar itself was built out of a 2×4 pine frame with beech veneer covering all sides and doubled up on top for added strength. We finished it up with a coat of stain and a few coats of urethane. It was well worth the effort and got tons of use over the years. Hopefully the new owner the apartment is still enjoying it today.
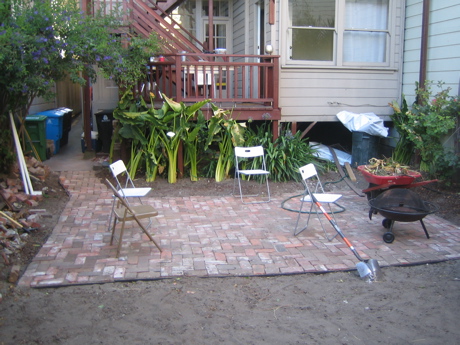
After many many car trips to random houses in the bay collecting 100 year old chimney brick and a days worth of laying we are finally done. We chose a herringbone pattern which was a little more complicated but totally worth it. The whole project was pretty easy just time consuming. A little research, making sure your patio is square, and grading the dirt before the sand is all you need to do. More pictures and a video will follow once the lighting and beds are done.